
Mocha Telnet Help
Edit/New Session
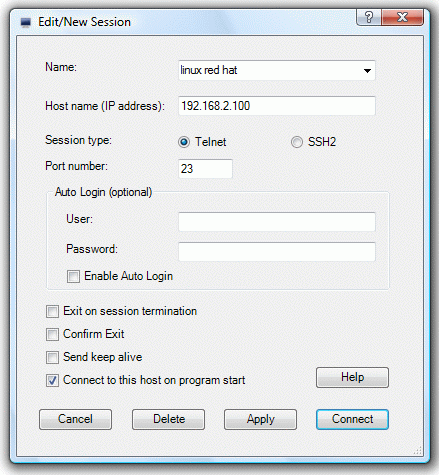
- Name: A session can be given any name, which will make it easier to remember it. The session name is also shown in the title bar, when the session is active
- Host name: Name of the host. Either a TCP/IP address as 155.22.11.2 or a DNS name.
- Session type: Either Telnet or SSH-2 (Secure Shell)
- Port number:Port number for the session. As default Telnet uses port 23 and SSH port 22
- Auto Login: User and Password for the user login on the host. Having these informations in this dialog gives less security.
- Exit on session termination:If the UNIX host terminates the session, Mocha Telnet will close without any notification.
- Confirm exit:If mocha Telnet is terminated (maybe with ALT F4), and a session is active, an exit confirm box will be shown.
- Send keep alive:The TCP layer is designed to keep the connection alive, but with network problems, this option can be used to send extra keep alive packets with 10 second intervals.
- Connect to this host at program start: If enabled, a session will be started, when the program is loaded.
Connect
A list with the already configured sessions are shown, and one can be selected.Disconnect
Use this command to disconnect the existing session with the Host.Page Setup
Opens the Windows Print Setup dialog.
The selected Portrait or Landscape mode will be remembered in the programs configuration file
Print Preview
Displays a small preview screen for the print. Use if when selecting the best font size, or if not sure, if landscape mode should be used.Exit
Close Mocha Telnet. It may be easier to press ALT+F4Logfile
These 2 functions can be used to copy small amount of data to/from a Host. Large data files should be copied with a file transport protocol and not the telnet protocol.It is possible to save all screen data from the Host in a raw format to a file. Select Logfile - Save to file in the menu, and choice a file to copy data to. Stop the data capture with selecting the menu element again. A file can be used as keyboard input. Select Logfile - Read from file in the menu, and select an existing file. Now all data in this file is send raw direct to the Host.
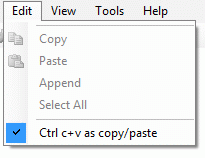
Edit Menu
Copy
Copies selected text from the Telnet Window to the Clipboard in Text mode.Paste
Pastes the contents of the Windows clipboard to the Host as keyboard data.Append
Appends selected text from the Telnet Window to the Clipboard.Select All
Selects the full screen.Ctrl c+v as copy/paste
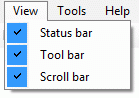
If selected, Ctrl + C and Ctrl + V can be used as local copy/paste functions. If not enabled, Ctrl + C and Ctrl + V are send to the host, as normal keyboard data.View Menu
Status bar
Toggles the status bar on and off.Tool bar
Toggles the tool bar on and off. Can also be controlled with program parameter /TScroll bar
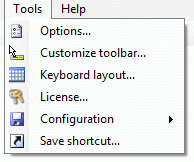
Toggles the scroll bar on and off.Tools Menu
Options
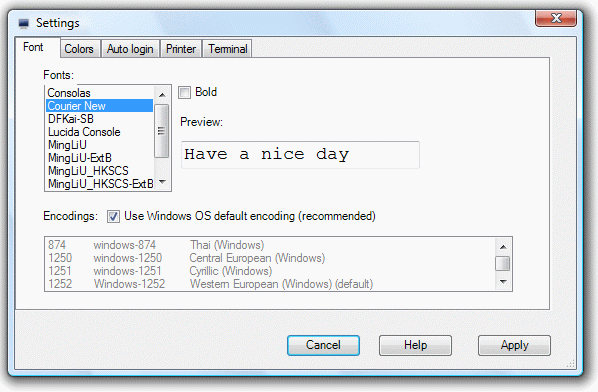
Fonts: Select a font name. The list is the non proportionally spaced fonts available in your system. The screen will be scaled to the font, giving a display of 24*80 characters.
Fixed width: If the width of a character should be increased when the 3270 window width is changed. This option solves a problem seen in a few cases, where the extraspace font option fails.
Encodings: It can be recommended to use the default Windows OS encoding. Only in a multi language environment, an encoding should be selected from the list.
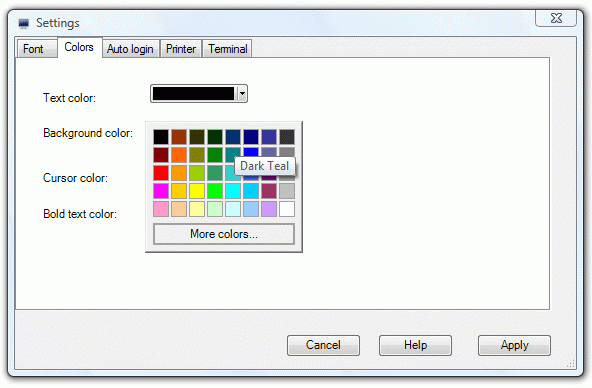
Colors
Text, background, Cursor and Bold text colors can be changed with this dialog. Click one of the 4 color elements to get a color picker dialog.
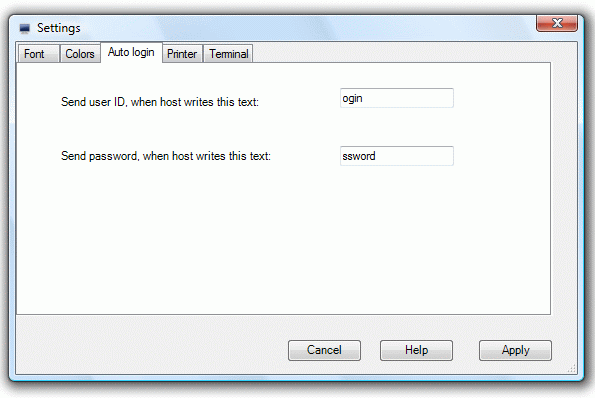
Auto Login
In menu - file - edit session dialog, it is possible to define a user and password for the UNIX Host. As to know when to send send the user id and password, Telnet will look for 2 data strings. These can be defined in this dialog.
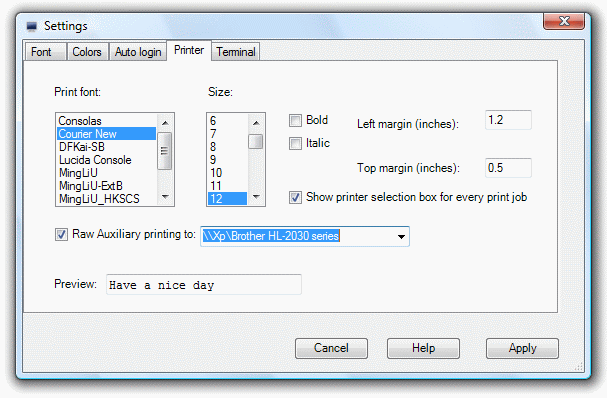
Printer
Fonts: Select a font name. The list is the non proportionally spaced fonts available in your system.
Size: Size of the font. Use menu - file - Print Preview, to experiment with different sizes.
Left margin: Left margin on the print in inches
Top margin: Top margin on the print in inches
Some printers may not write to the edge of the paper, and therefore you may see a difference between these margins and the real print.
Show printer selection box for every print job: As default the printer dialog box is shown when activating the print icon in the tool bar. This option will assume the user will send print to the Windows OS default printer.
Raw Auxiliary printing: The data from the Host can include escape sequences telling either some data or the screen to be send to a printer. The data is not translated, and must be in a format the printer can accept. It will work with most Matrix Printers, but a normal Laser printer will fail and and may print a lot of garbage. The example screen above shows a Brother HL-2030, and it is a good example of a printer which can not be used for auxiliary printing!
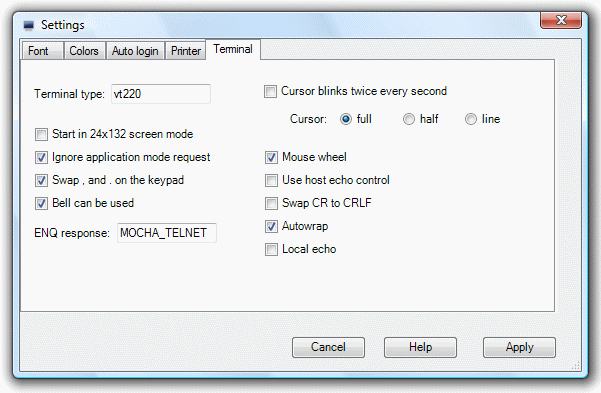
Terminal
Terminal type: Use this command to define the telnet Terminal type. As default it is vt220. This type is send to the Host on session setup, and will be saved as the environment variable TERM.
Start in 24x132 mode: As default the 24x80 character screen size is used.
Ignore application mode request: A VT220 keyboard can run in a normal or application mode. In application mode the keypad keys will send fixed values, and these cannot be configured in the keys.map file. Use the option in this dialog box to ignore a application mode request from the host.
Swap , and . on the keypad: If NumLock is used, the value for the Del key may be "." or ",". Use this option to swap the value.
Bell can be used: The UNIX host can request Telnet to use the Bell.
ENQ response: The host can ask a VT220 terminal for an ID
Cursor blinks twice every second. The cursor can either be steady, or blink. Software for blind people may use this option.
Cursor size: Different sizes can be tried. Default is full.
Mouse wheel: If enabled the mouse wheel can be used to scroll the screen
Use host echo control: The Host can control, if local echo should be used.
Swap CR to CRLF: Select if the Return key should send CR or CRLF.
Local echo: Defines if characters typed on the keyboard should be echoed local on the screen.
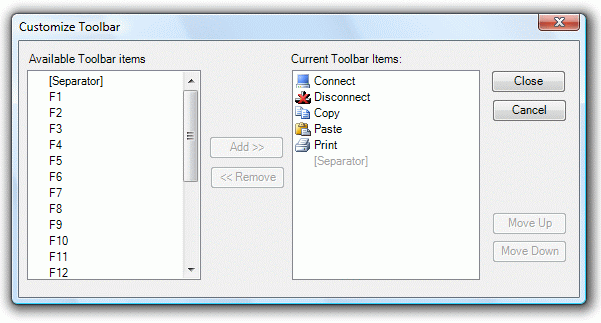
Customize Toolbar
Use this dialog to change the layout for the tool bar. Click on an element and use Add and Remove to move elements to and from the tool bar
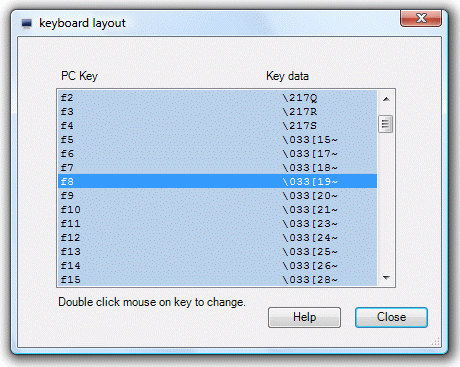
Keyboard Layout
Mocha Telnet is as default defined for a VT220 keyboard. Notice keys F1 - F5 are local keys on a real VT220 terminal, and the data these keys should transmit are not defined in any standard. Use UNIX program infocmp to view the current configuration in use.
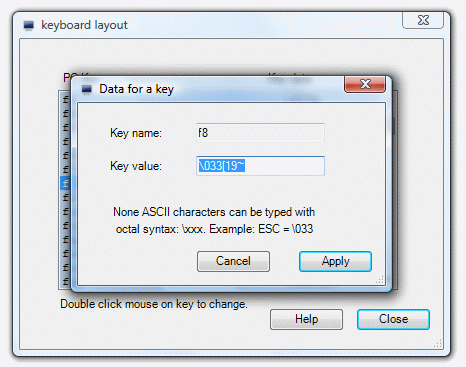
Double Click on a key in the list to change, and the following dialog is shown:
None ASCII characters can be typed in Octal: \xxx.
Tips: The Calculator included with the Windows OS, can translate numbers to octal values.
License
After ordering Mocha Telnet from MochaSoft, a license key will be received. Enter the key together with the Company Name given on the order. As there is link between the Company name and license key it is important to enter both very careful.
Configuration
The configuration is stored in a file named user.config. The location is in a special Windows-compliant folder. The location depends on the location where Mocha Telnet was executed from. See menu - options - configuration - details for the locations.
Export: Copy the current configuration to a file
Import: Read data from a user.config configuration file to the program.
Reset: Reset the configuration to the default values.
Details: Shows program and configuration file locations.
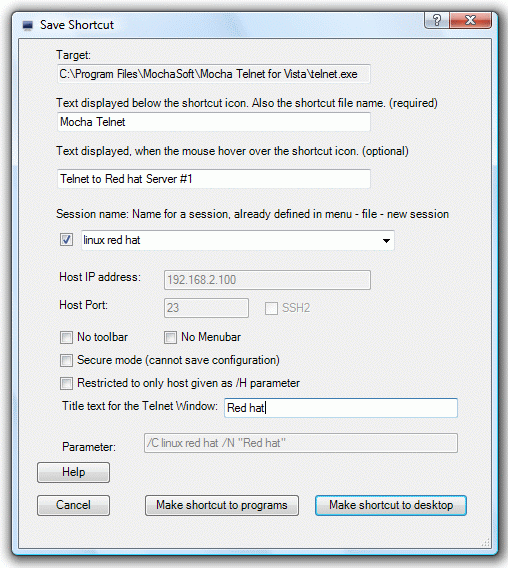
Save shortcut
Use this dialog to make one or more shortcuts to Mocha Telnet.
Make shortcut to programs: Make a shortcut to Windows Programs folder, which is selected from [Start]
Make shortcut to desktop: Make a shortcut to the current users private desktop.
Help
Help: Shows the online help system
About: Shows program details, such as version and license state.
Notice the [Release notes] options gives the latest details about the software, such as bugs and problems fixed since the last release.


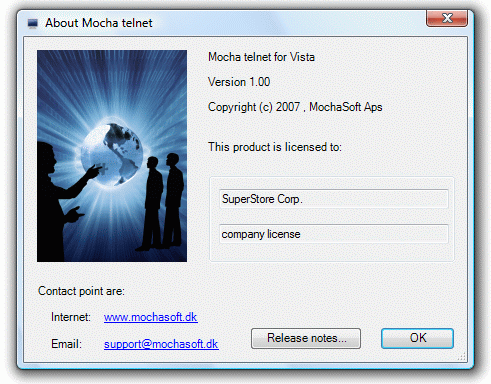
Copyright (c) 1997-2025 MochaSoft Aps. All Rights Reserved. |